|
|
Post by ddlova on Feb 25, 2010 0:49:22 GMT -5
i had seen this project somewhere else but didn't know that you had progressed this far! awesome scratchbuilding work!
for the tires i was thinking you could use some big O-rings maybe? you can grind the center hole out to fit your wheels with a sanding drum in your Dremel. if you find an O-ring that's round and fat enough to bulge the tread area and the sidewalls at the same time then the hole can be adjusted to fit. you can even sand the sides of the ring down if you need to as well.
i was going to recommend a grease spatter screen to for the grille mesh. some of them have a very fine mesh , but some don't. there is a chemical on the market for military and model train guys called Blacken-It for metals that would work on some screen. i think there is a type of metal that it doesn't work on but i don't remember which.
Dave
|
|
|
|
Post by denconresin on Feb 25, 2010 3:08:16 GMT -5
|
|
|
|
Post by coopdad on Feb 25, 2010 12:41:05 GMT -5
i had seen this project somewhere else but didn't know that you had progressed this far! awesome scratchbuilding work! for the tires i was thinking you could use some big O-rings maybe? you can grind the center hole out to fit your wheels with a sanding drum in your Dremel. if you find an O-ring that's round and fat enough to bulge the tread area and the sidewalls at the same time then the hole can be adjusted to fit. you can even sand the sides of the ring down if you need to as well. i was going to recommend a grease spatter screen to for the grille mesh. some of them have a very fine mesh , but some don't. there is a chemical on the market for military and model train guys called Blacken-It for metals that would work on some screen. i think there is a type of metal that it doesn't work on but i don't remember which. Dave Thanks all for the kind words. Dave, I was thinking the same thing, hitting Home Depot and seeing what would fit into the tire starting in the O-ring dept. Spatter screen? Humm, I bet I could pick one of those up at the Dollar store for... a dollar! I had heard about the Blacken it stuff but never tried it. I see to remember a guy using it to blacken Photo Etch during a demo at our model club meeting. I will have to see how much it runs at the local hobby store. Thanks again! John |
|
|
|
Post by coopdad on Mar 8, 2010 10:03:25 GMT -5
With it being such a nice, sunny weekend with everyone in the house sick except me I was able to do some building during daylight. Getting tired of everything being styrene white and resin tan I decided to treat myself and get paint on something. In this case I focused on my favorite area: wheels/tires. The wheels came from RMS Resin. They started out very deep so I cut them down to a more realistic depth. Note, fronts and rears are different. Top is the original, left is the rear, right is front.  Ryan threw in the knock offs for free. And after paint I think they look pretty close. The wheel with the red knock off is the spare... not sure why they made it different but hey, can't argue.   As always, any questions, feel free to ask. John |
|
|
|
Post by coopdad on Mar 8, 2010 10:48:59 GMT -5
Was also able to get some paint on the motor:   I also finished the front of the motor. Scratch built the pump, pulley and belt. Also added mounting brackets to the alternator. The fan in real life looks like it was quickly painted with a spray can so I tried to do the same by painting over bolt heads. Scratches on the blades (and oil pan) showing metal underneath are intentional. They will be mounted later... gotta make sure I can get the motor into the frame with that stuff attached. I would hate to have to take it off.  John |
|
|
|
Post by jeffs396 on Mar 8, 2010 14:14:58 GMT -5
Looks good John!
I like those rims, couldn't find them on the RMS site though? Did you end up filling the tires with anything to "plump" them up? Some Firestone lettering on the sidewall & they'll look like the 1:1s!
Nice detailing & weathering on the engine too!
|
|
|
|
Post by Big Ed on Mar 8, 2010 14:57:19 GMT -5
Hey John. What else can I say but incredible. I do run out of positive things to say at times, but I am amazed at your scratchbuilding and general building all around. I go back to your Bronco sometimes just for inspiration. And the wheel/tire combo looks great.
|
|
|
|
Post by kolbenschmidt on Mar 8, 2010 17:37:43 GMT -5
This thing is sooo cool! cant wait to see it finished!
|
|
|
|
Post by wtsf150 on Mar 8, 2010 17:37:55 GMT -5
John this thing is looking awesome as good as if not better than your other Bronco you built how did you do the rusting on the headers looks perfect
Willie
|
|
|
|
Post by coopdad on Mar 8, 2010 18:53:52 GMT -5
I like those rims, couldn't find them on the RMS site though? Did you end up filling the tires with anything to "plump" them up? Some Firestone lettering on the sidewall & they'll look like the 1:1s! Ryan said he was dumping his regular site in favor of selling on ebay only. I will see if I can find his store. I did find some Firestone lettering somewhere but it was like $8... right now money is very tight. John this thing is looking awesome as good as if not better than your other Bronco you built how did you do the rusting on the headers looks perfect Willie Man, those awful headers! I spent 4 nights, 3 hours each getting them to fit. Oh well, another story. They are painted using a rust colored primer. Then I used a light tan to mist them, creating a texture. Lastly I washed it with my "Magic Rust" solution: www.offroadmodels.proboards.com/index.cgi?board=howto&action=display&thread=9Thanks all for the kind words. John |
|
|
|
Post by coopdad on Mar 16, 2010 8:10:50 GMT -5
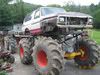
Been working on all those tiny little things that make scratchbuilds just look home made: seams that don't line up perfectly, rough filler under paint, holes not perfectly round, etc. I really admire the guys that make these things for model companies. A few more photos...   Not sure about the tires. They look a little small, a little slim. I really need to make time to hit Home Depot and find the o-rings and see if that helps. Another problem showed up yesterday. The top wing had, for some reason, become warped/wavy. The thing was no longer flat and since it will be chrome, it will be very obvious. Going to try a few things before making another. John |
|
|
|
Post by wtsf150 on Mar 16, 2010 14:46:09 GMT -5
John this is looking great man i really like your attention to the small details as for the wing problem not sure how your building it but would braces in the middle on the inside of course help out
Willie
|
|
|
|
Post by kolbenschmidt on Mar 16, 2010 15:53:07 GMT -5
That truck is sooo cool! I love the wheel/tire combo.
The tire size looks right to me. Can you post more mock up pics please?
|
|
|
|
Post by coopdad on Mar 16, 2010 17:06:00 GMT -5
Willlie, it is strange that the waves (and now twist) happened long after I built the thing. I suppose I could try epoxying some sorta metal strips in there... styrene is just too thin to do any good and still fit. I guess it won't warp again after it is attached to the roll bar but you never know. I guess it is good that it happened now rather than later.   Forgot to post the rear axle before... lots of stuff that attaches to it. It is a three-link system connecting at the top of pumpkin and to the front bottoms. On top of those mounts are the shock mounts connecting to the spring mounts. At the rear are the sway bar connections. On top of those are large plates that hold big rubber bump stops. And there is a Panhard Bar connection on the back too (can barely see it at the top rear).  Also here are some new things... the spare tire mount and a thing that I am not sure what it is (think it holds a highlift jack). The unconnected sway bar can be seen flopping underneath.  kolbenschmidt, I will try to remember to take photos the next time I test fit parts. Thanks for watching, John |
|
|
|
Post by wtsf150 on Mar 16, 2010 17:38:44 GMT -5
John shes looking good love the detail in the axle as for the wing metal might be better but i think only if you could find some very small angle stuff i think it still might do it if you used just the strips of metal that is strange how it only happend after it was finished i wonder if the fumes played a role after it was assembled?
Willie
|
|