|
|
Post by kolbenschmidt on Mar 16, 2010 18:23:15 GMT -5
Thanks!
|
|
|
|
Post by Big Ed on Mar 16, 2010 19:10:45 GMT -5
John, incredible work.
|
|
|
|
Post by jeffs396 on Mar 16, 2010 21:54:34 GMT -5
As always John, nice work!
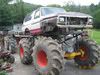
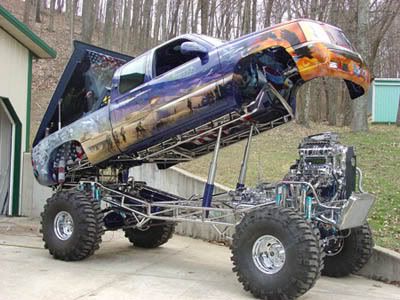
As far as the tire sizing, looking at your 1:1 reference pics it looks like the tire size as compared to the scale set is very close...the engine in your mockup looks on the small size compared to the rest of the vehicle. Was the toy you copied the body panels from 1/25 or 1/24 scale, or a bit larger?
Alan's mud terrains would fill the wheelwells more, but the tread pattern wouldn't be close.
|
|
|
|
Post by coopdad on Mar 17, 2010 8:28:03 GMT -5
Oh gosh, don't say that!!! It might look small but I believe it is 1/24 (the toy is almost exactly 1/24). I had two 302/351s in my parts box and the other was much smaller by comparison. Though I don't know for sure, I assume the small one was 1/25 and the other 1/24. Besides, if I did have a larger one, there would be no way to get it squeezed in there (I really know how the builders of the 1:1 felt).
I am communicating with Alan right now. I will email and see if he can add Mud Terrains in the package he is sending. If they do not fit/work/look right, I will certainly use them on a future build.
John
|
|
|
|
Post by coopdad on Mar 19, 2010 9:46:00 GMT -5
I have learned in the past (the hard way) that the quality suffers if you have to make corrections after the paint is on. So, I have been pretty paranoid about painting anything. But I'm getting sick of building parts so I'm gonna paint something. The color of the cage is straight-out-of-the-can Acapulco Blue, a Ford color from that time period so I believe it to be the right color.  I have not used Testors Model Master Lacquer paints before now. They lay down very nicely, stink though. John |
|
|
|
Post by ddlova on Mar 19, 2010 14:19:54 GMT -5
i love the Testors/Model Master lacquers! can't smell them though through my respirator.
one thing i have noticed when spraying the one coat colors though is a whole lot of flake floating around in the air.
nice to see some color on there! i really like that dual fuel cell set-up too.
Dave
|
|
|
|
Post by coopdad on Mar 26, 2010 7:43:11 GMT -5
A little more done... rear plumbing added (test fitted).  Now on to the front plumbing. J |
|
|
|
Post by kolbenschmidt on Mar 26, 2010 17:02:17 GMT -5
Looks awesome!
|
|
|
|
Post by wtsf150 on Mar 26, 2010 17:28:51 GMT -5
Very nice work John but why are the fuel lines running into the cage? did they route the lines through the bars? nice work very nice
Willie
|
|
|
|
Post by coopdad on Mar 26, 2010 19:42:49 GMT -5
Willie, the lines are vents for the fuel cell. Filling the cage with gas fumes seems a little scary to me by I guess there is nothing in there but air anyway.
Reminds me of something I read years ago. The cages of Porsche 917s were pressurized with air and an air pressure gauge was attached. That way if a crack happened, then the gauge would show low or no pressure. I have always loved the creative thinking of race car builders.
John
|
|
|
|
Post by wtsf150 on Mar 26, 2010 21:07:56 GMT -5
Thanks John im always amazed myself at what they will do to "stretch" the rules and stuff i kinds thought they might have been vents but wasnt sure
Willie
|
|
|
|
Post by hjracing on Apr 2, 2010 7:20:27 GMT -5
The job you been done is really awesome Coopdad, I really admire this kind of scratch built.
|
|
|
|
Post by coopdad on May 8, 2010 15:40:32 GMT -5
With so much tweaking and testing there has been some but slow progress. A few more pix.  Front radiators:  The dash boards:   Enjoy. |
|
|
|
Post by Big Ed on May 15, 2010 21:24:17 GMT -5
John, what can I say that I haven't already said? I love your work. I like how everything seems to fall where it should....."pre-planning"! I mean I'm slow as molasses in winter, but that's because I'm always re-doin' things that I didn't pre-plan. In a hurry but always in reverse. You're an inspiration John. Thank you.
|
|
|
|
Post by kolbenschmidt on May 16, 2010 15:33:37 GMT -5
Ditto!
|
|